


.jpg?cx=0.490000009536743&cy=0.540000021457672&cw=150&ch=120&blr=False&hash=0B0F55675A6B9FE3724F6E2EC9118A01)


.jpg?cx=0.490000009536743&cy=0.540000021457672&cw=150&ch=120&blr=False&hash=5E78490B76BBC8CC9D76D2EBDFF515E0)


7 Steps For a DIY Facial At Home
February 17, 2022

The cold winter months are notorious for dehydrating our skin, leaving it feeling parched and dry. This is why we like to treat our complexions to DIY hydrating facials once a week, complete with deep cleansing, moisturizing masks, and rich creams. There’s no better way to get rid of the Sunday Scaries than with a little in-bed pampering session, especially when it feels as good as the real thing. Below, we’re sharing a simple step-by-step tutorial to show you how to give yourself an ultra-moisturizing DIY facial in the comfort of your own home.
STEP 1: Cleanse Your Skin
The first step in any facial — whether at the spa or at home — is cleansing. You'll want a clean canvas to ensure you get the best results from the skincare products you've chosen. Reach for a hydrating cleanser like the CeraVe Hydrating Facial Cleanser. The creamy texture soothes and hydrates without stripping the skin.
STEP 2: Cleanse Your Skin…Again
It's not a bad idea to follow up with another face wash to ensure all traces of dirt and impurities are effectively whisked away. Referred to as double-cleansing, this method was first popularized in South Korea and involves cleansing your skin twice — once with a water-based cleanser like the CeraVe option mentioned above and then again with an oil-based cleanser like the Kiehl's Ultra Facial Cleanser. It’s formulated with squalane, avocado oil and glycerin to help maintain skin’s natural balance and protective barrier.
STEP 3: Exfoliate Your Skin
The next step in your at-home facial is exfoliation. Just as you want a clean complexion, you also want one that’s not covered in dead skin cell buildup. One of our favorite ways to slough off dead skin cells lingering on skin’s surface is by using the L’Oréal Paris Revitalift Derm Intensives 5 % Glycolic Acid Toner. This chemical exfoliator can transform skin from the chest up into a smoother, more radiant-looking complexion, plus it’s gentle enough for daily use.
You can also exfoliate your skin mechanically with a face scrub. The key is to make sure the formula is gentle and not formulated with harsh or abrasive beads or grains. We recommend the La Roche-Posay Ultra-Fine Scrub. It can help to remove dead skin cells build up for skin that’s smooth and purified. All you have to do is splash some water on your face, apply the scrub to wet skin, gently massage in circular motions, and rinse.
STEP 4: Steam Your Face
Steaming has gained traction among skincare enthusiasts, and those willing to take the time to include this old-school beauty ritual. The best part about at-home facial steaming is that you can customize your water and ingredients — think: lavender or chamomile oils — to your liking and skincare concerns.
For the most effective results, keep a towel over your head, so as much steam as possible is directed toward your face. You don't need a fancy spa steam machine to enjoy the benefits of steaming your face. Using these simple steps, you can steam your face spa-style at home.
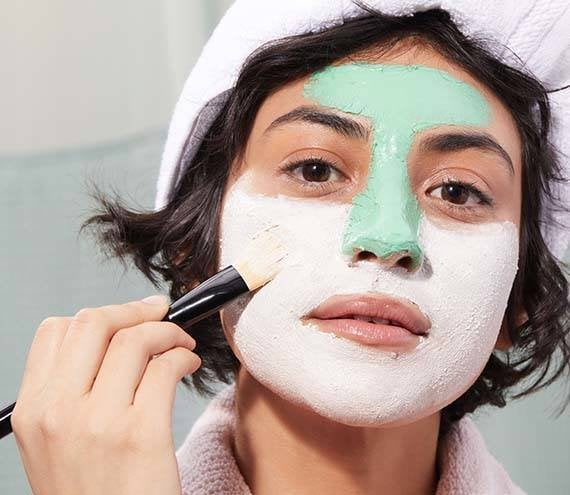
STEP 5: Apply a Face Mask
No facial is complete without face masks. For our at-home winter facial, we like to use sheet masks like Garnier Green Labs Pinea-C Brightening Serum Sheet Mask. Not only are sheet masks hydrating, but they also involve no cleanup, so instead of rinsing, rubbing, and potentially dehydrating your complexion, you can remove the sheets and then rub in the leftover serum for even more hydration.
STEP 6: Spot Treat Blemishes
After removing your face mask, it’s time to address any existing blemishes with a spot treatment. Most spot treatments contain varying percentages of acne-fighting ingredients benzoyl peroxide, salicylic acid, or sulfur. If you aren’t sure which zit-zapping spot treatment to try, check out a few of our recommendations below.
The Kiehl’s Breakout Control Targeted Acne Spot Treatment is the perfect solution for those looking to reduce the appearance of acne. This spot treatment blends evenly into the skin, helping to reduce redness. Limit the number of applications if you notice drying or peeling occurring during your at-home facial.
STEP 7: Moisturize Your Skin
As the last step to your at-home facial, you'll want to lock in hydration. To do so, start with a serum and layer a moisturizer over top. After all your skin has been through during your at-home facial, it needs to be nourished with essential moisture. And whenever we think of hydration, our minds immediately travel to powerhouse hydrating ingredient hyaluronic acid. To add hyaluronic acid to your routine, reach for IT Cosmetics Bye Bye Lines Hyaluronic Acid Serum.
After applying a serum, follow with a rich moisturizer. SkinCeuticals Triple Lipid Restore 2:4:2 is an excellent option for dry skin in need of nourishment. It restores essential skin lipids which play an essential role in the skin's barrier function with ceramides, natural cholesterol, and fatty acids. Got oily skin? That’s no excuse to skip on hydrating. Just use an oil-free moisturizer, such as the Summer Fridays Cloud Dew Oil-Free Gel Cream Moisturizer. The ultra-light gel-cream is non-greasy and provides an instant cooling effect that'll feel great after a facial.
Bonus At-Home Facial Tips:
Set the Mood: Giving yourself an at-home facial is arguably more enjoyable when you take the time to set up your surroundings. Set the mood for your at-home spa ritual by lighting scented candles and dimming the lights.
Bring Out Your Jade Roller: If you have a jade roller handy, whip it out during your facial to help de-puff puffy areas and assist with circulation. Store yours in the fridge for cooling benefits.
Take a Bath: Once your at-home facial routine has wrapped up, hop into a warm bath. Add some hydrating bath oils for the ultimate aromatic experience. Follow with an application of scented body cream or butter onto damp skin.
Wear a Robe: Who doesn't want to feel a little extra luxurious? During your at-home facial, cozy up in your favorite bathrobe as you go through all the aforementioned steps.
Photo: Chaunte Vaughn
Read More:
When Is the Best Time to Use a Face Mask?